Artificial Intelligence
Intro and Short Tutorial on Data Annotation with Label Studios
September 14, 2022
9 min read

Data annotation is the process of labeling each point of a dataset to show the actual output that the supervised machine learning model needs to predict. It is the process of categorizing and labeling data; meaning that the user would take each data point available and manually classify it for the machine learning model to use.
For example, to build a machine learning model that takes an image of a cat or a dog and can differentiate and predict which animal is found inside the given image, then the user will need (for example) to feed the model 1,000 images of both animals (500 images for cats and 500 for dogs). For this to work, before feeding the model these images, each image should be labeled as either a dog or a cat. The process of labeling each image into one of these two categories before running them through the model is what data annotation is.
Labeling tens of thousands of data points one by one is tedious, but alternative ways have developed making this task easier. This is where a data annotation tool comes in handy!
Data annotation tools are used to annotate (label) data points in a data set which can help label data sets used in machine learning, deep learning, computer vision, natural language processing, and more.
Different data annotation tools can be used depending on the given task. For example, depending on the data type (text, image, audio) will help decide which tool to utilize. Some companies even create their data annotation tools.
For this article, we used Label Studio, a data annotation tool that allows for the annotation of multiple different data set formats, such as text, images, audio, time series, and multi-domain.
Label Studio is an open-source data labeling tool for labeling and exploring multiple types of data. It allows a user to perform different types of labeling with many data formats. Users can also integrate Label Studio with machine learning models to supply predictions for labels (pre-labels) or perform continuous active learning.
In this article, we will be using Label Studio as our main data annotation tool. We will go over some examples showing how to annotate or label different data sets with different data formats. Before that, we must first start by installing Label Studio software on our device!
The actual installation and usage process of Label Studio is incredibly easy. They offer a small learning curve with a considerable focus on being beginner-friendly accompanied with easy-to-download, short commands, and a clear easy-to-use GUI,
Label Studio offers a diverse set of data formats and labeling choices. For different data formats, Label Studio offers data annotation for images, audio, text, time series, and multi-domain data formats. When it comes to image labeling Label Studio offers object detection, image classification, and semantic segmentation. While text annotation offers text classification, question answering, sentiment analysis, and named entity. For other labeling techniques, please check the official Label Studio website.
With a well-documented website and tons of online tutorials and videos on the usage of Label Studio, users can always find online help when stuck!
Workstations that just work, plain and simple. Exxact offers exactly what you need, tailored specifically to your workload. Contact us today!
Install Label Studio using either pip, brew, git, or docker. We will use pip to install label studio by copy-pasting the following line into the cmd (command line interface):
ip install -U label-studio
After finalizing the installation, copy-paste the following command into the cmd:
Label-studio
Using the following command, a browser page of label studio will be up and open on the browser of your choice.
After that, Label Studio will ask for you to sign up using your account. If necessary, create a new account that only requires an e-mail and password to sign up.
In this simple text data annotation tutorial, we will classify any word belonging to either an animal or an object into two groups.
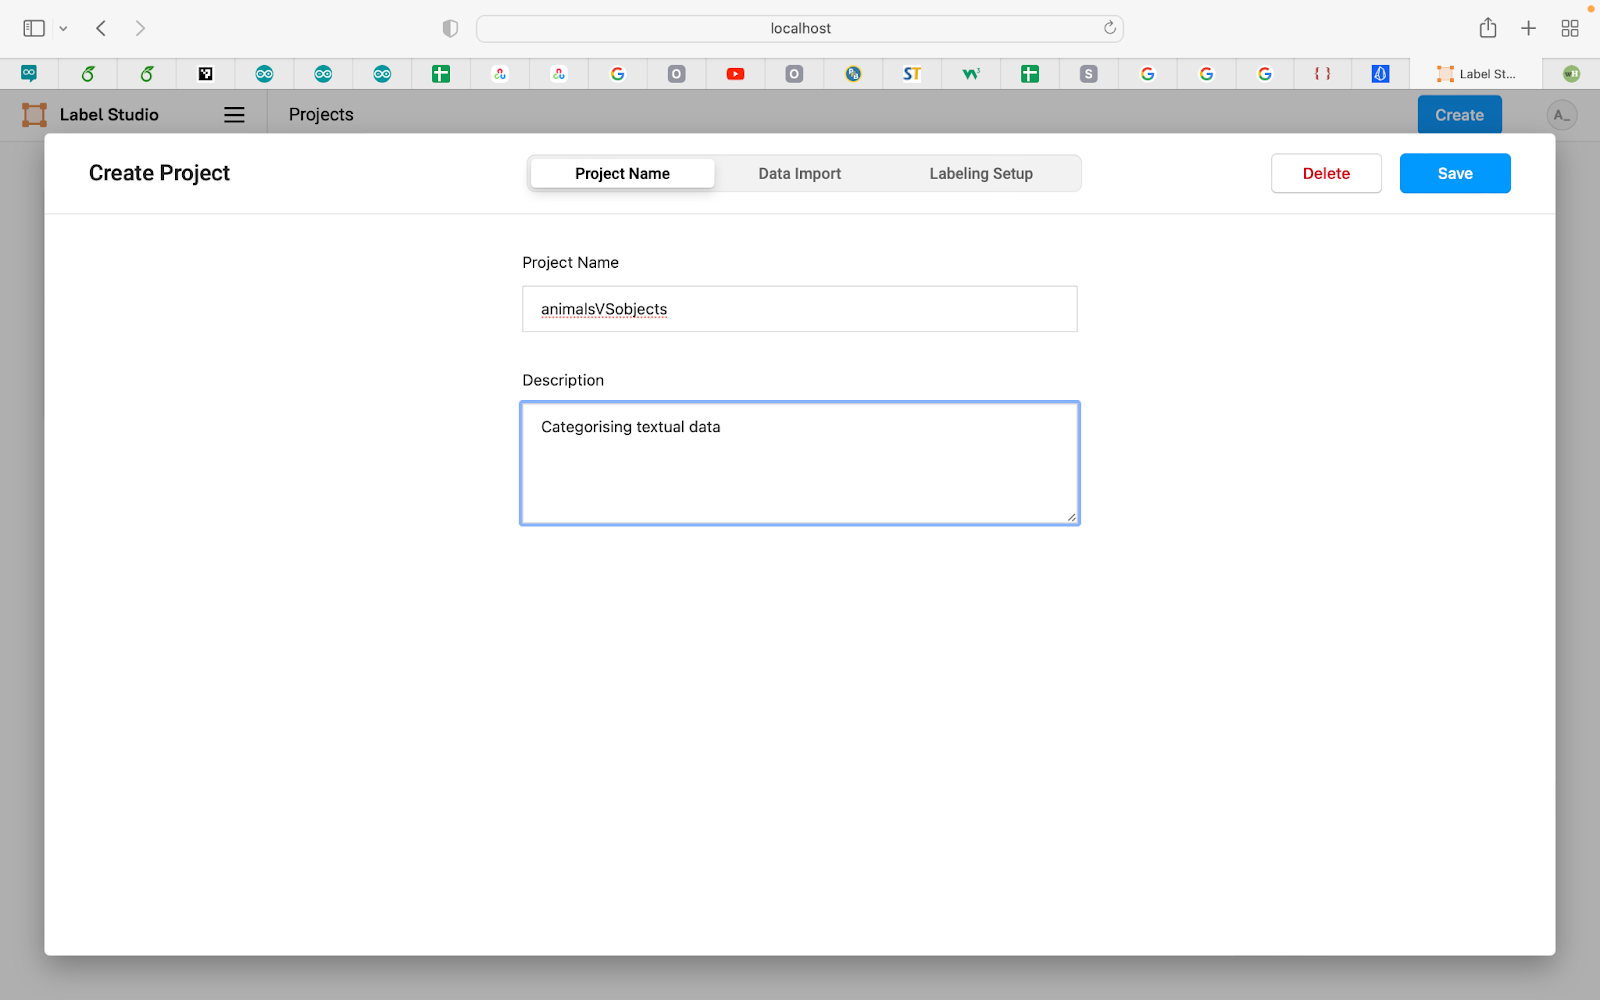
After logging in to your Label Studio account, start by creating a new data annotation project. Choose a name for your project and give a brief description of what you are trying to achieve with it. In this case, we named the project ‘animals vs objects’ and stated that the main aim is to categorize textual data.
After naming your project and giving it a project description, click on the Data Import button in the center top of the screen. Then click on ‘Upload More Files’ and import the data set of your choice from your local device. For the data used in this example, we have written three simple sentences, each containing a word relating to an animal, an object, or both. Make sure to upload the data file in an accepted format. The format used here is a .txt extension.

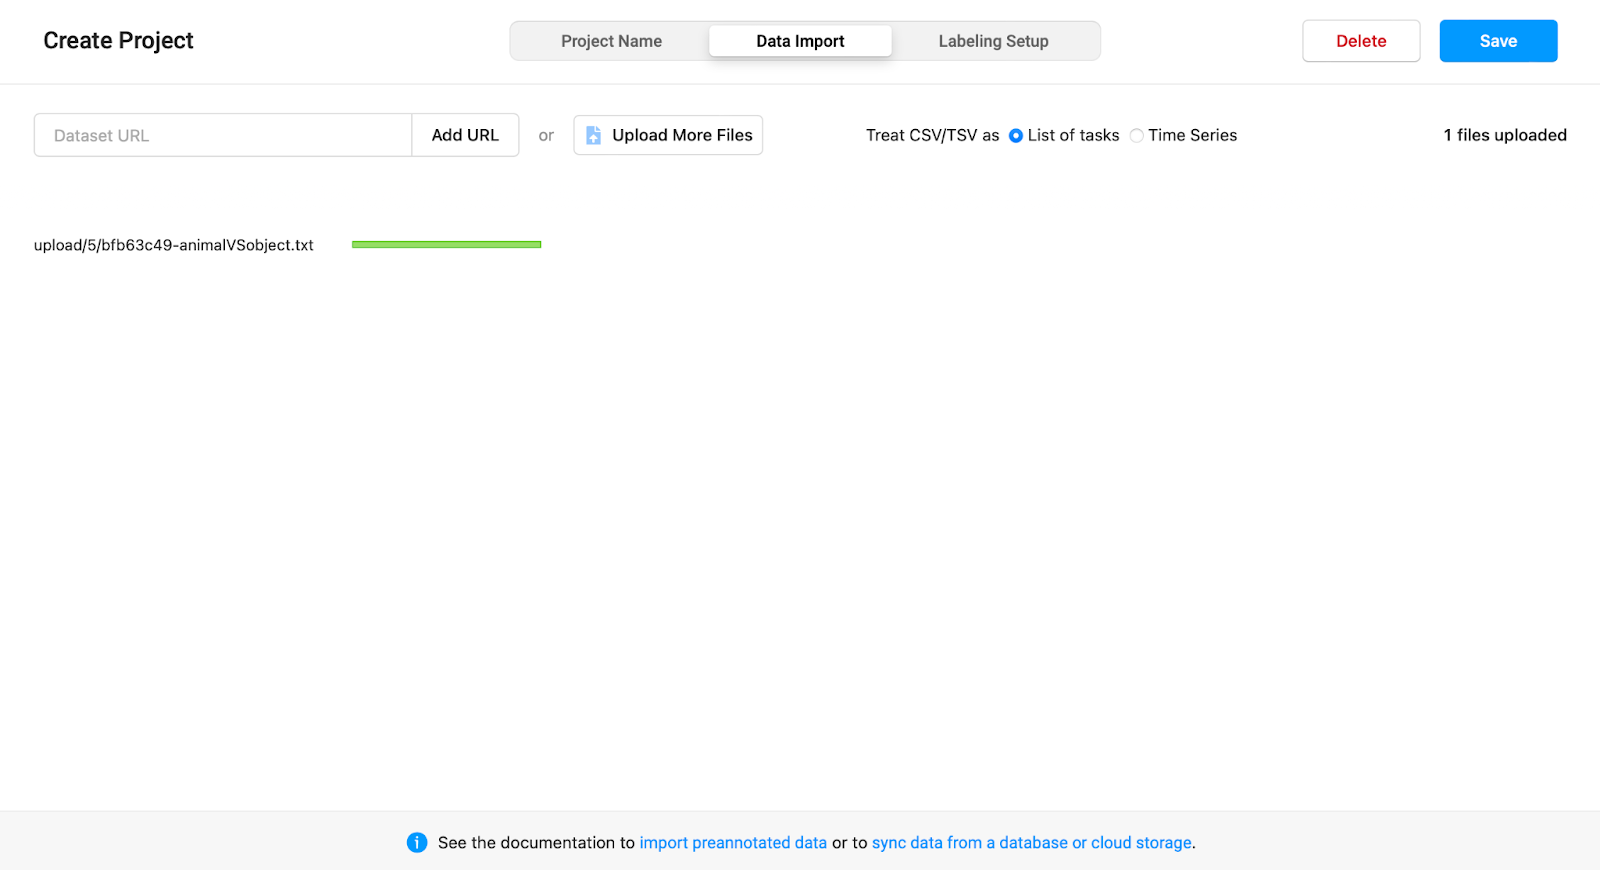
Note: do not forget to choose the ‘treat CSV/TSV as a List of tasks’ option.
Next, click on ‘Labeling setup’ on the top right of the screen. As stated earlier, we want to perform data annotation on text data, so click on Natural Language Processing. Natural language processing is a subfield of linguistics, computer science, and artificial intelligence concerned with the interactions between computers and human language, and how to program computers to process and analyze large amounts of natural language data. 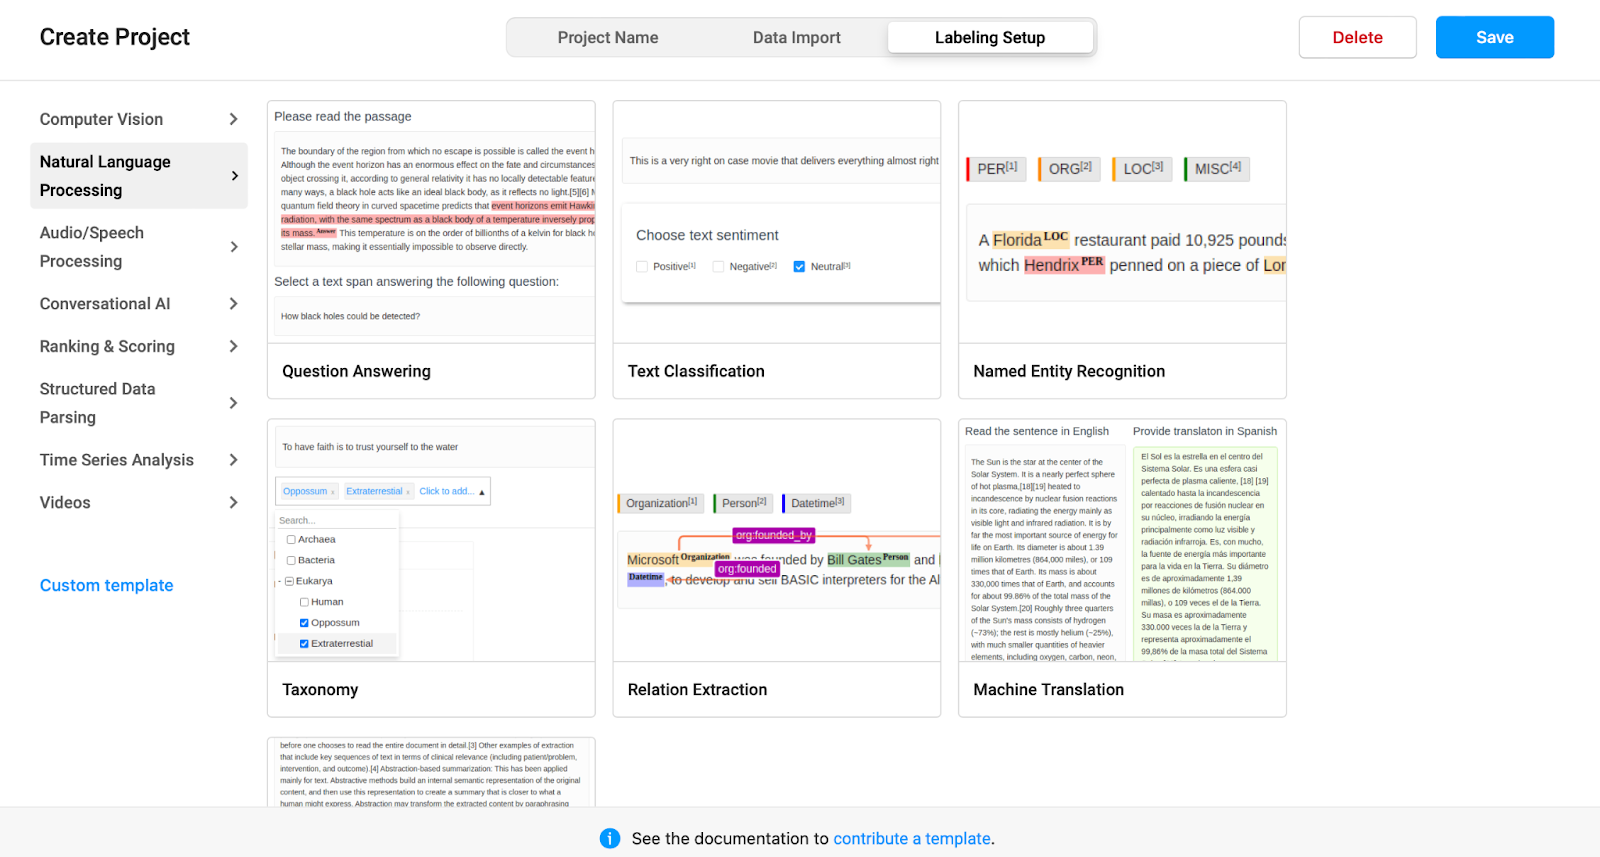
Next, click on the ‘Named Entity Recognition’ which will allow us to categorize our data into multiple categories of our choice. Named-entity recognition is a subtask of information extraction that seeks to locate and classify named entities mentioned in unstructured text into pre-defined categories such as names, organizations, locations, medical codes, time expressions, quantities, monetary values, percentages, etc.
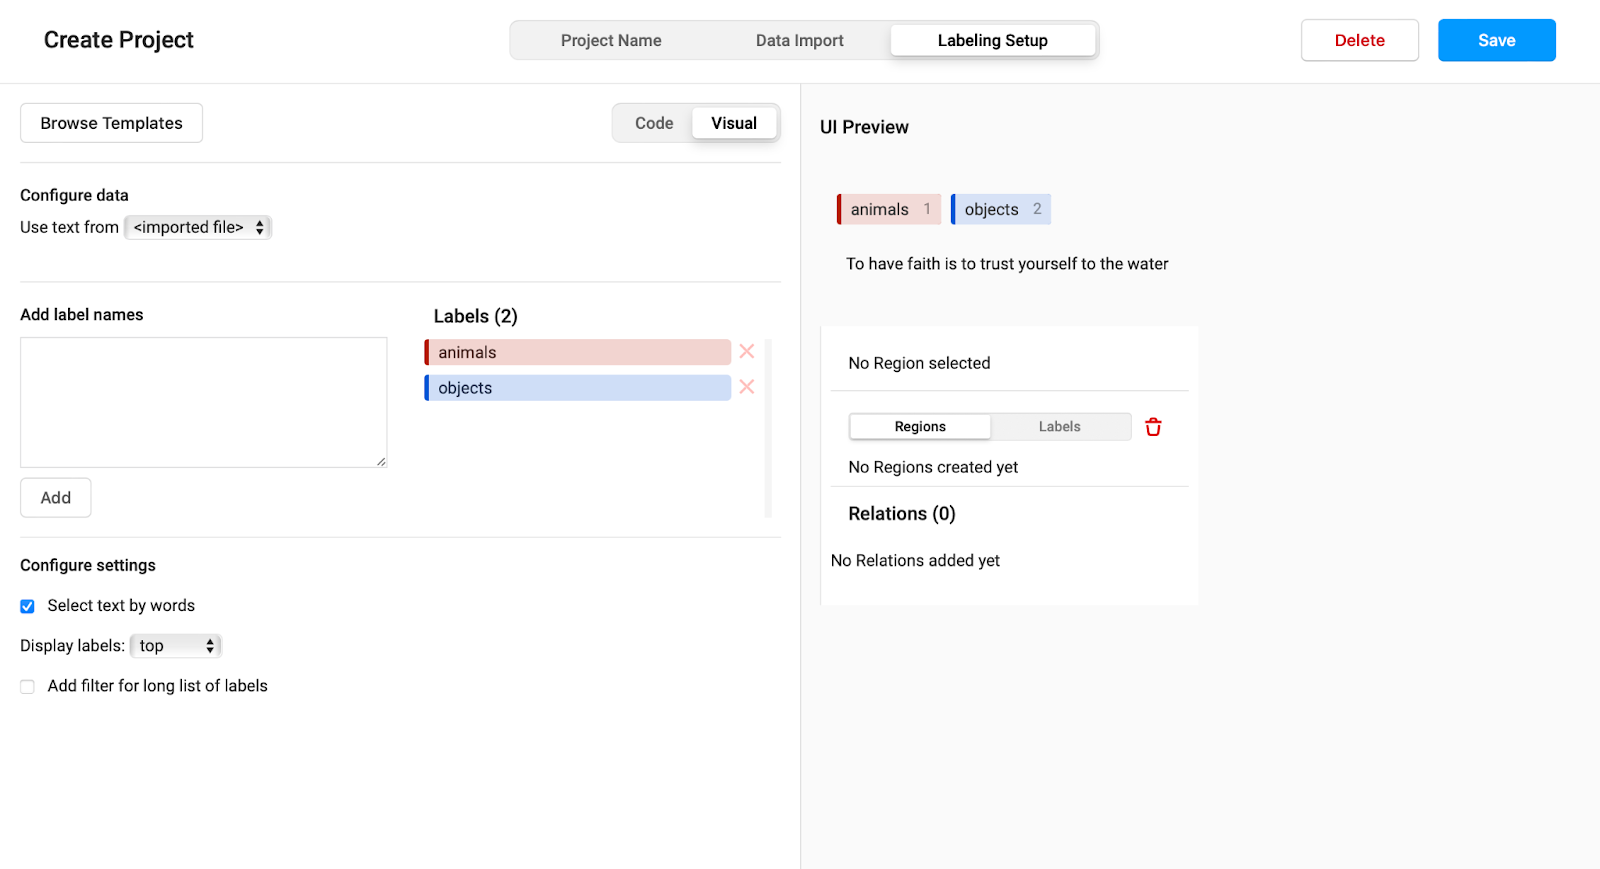
After choosing the template option, which in our case is the Named Entity Recognition, we will need to identify our labels or classes. We will delete all the existing labels and create two new ones, the animal and object labels. To create these two labels go to the Add Label names text box on the left of the screen and write these two classes onto two separate lines. After that click on the Add button just below the text box.
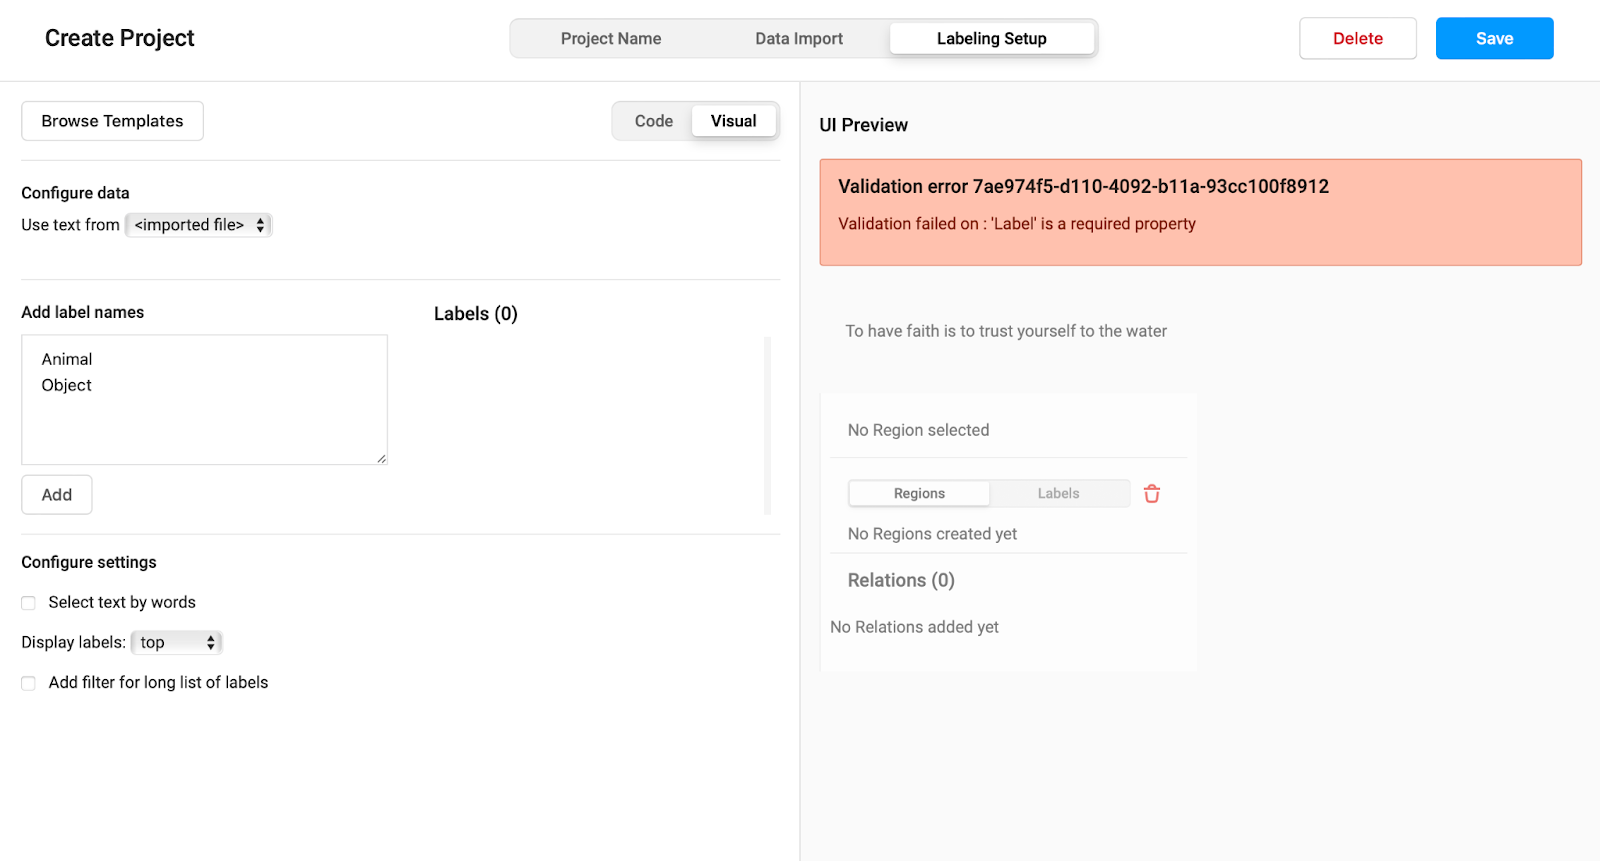
After adding the labels you can change the color of each tag as you like. We chose to have the animal class as red and the object class as blue. Once you’re finished, click on the save button on the top right of the screen.
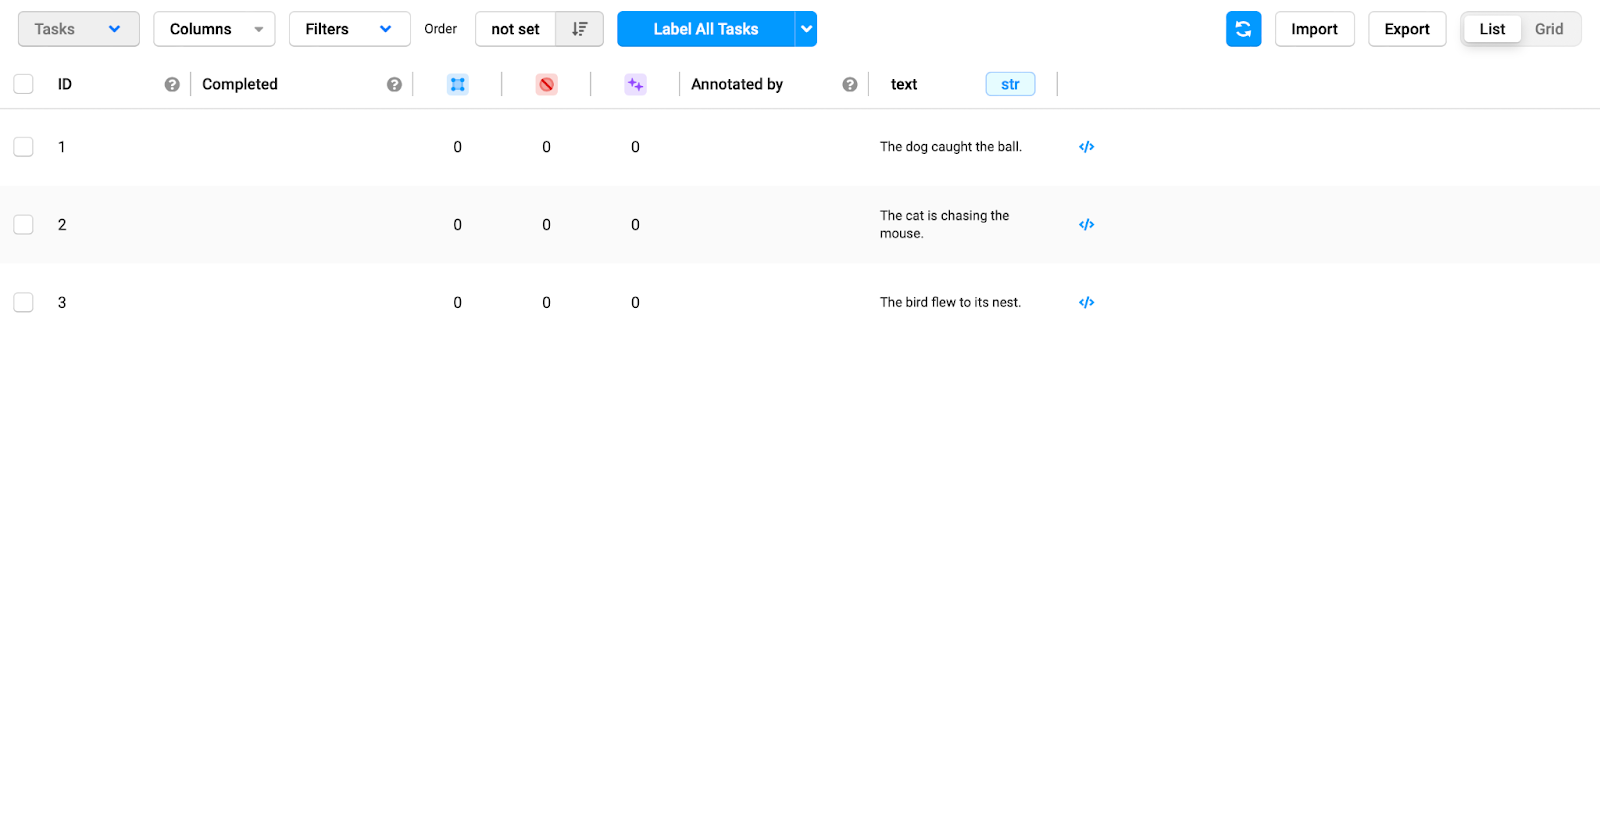
After that, you should find a list containing all the columns found in your data.
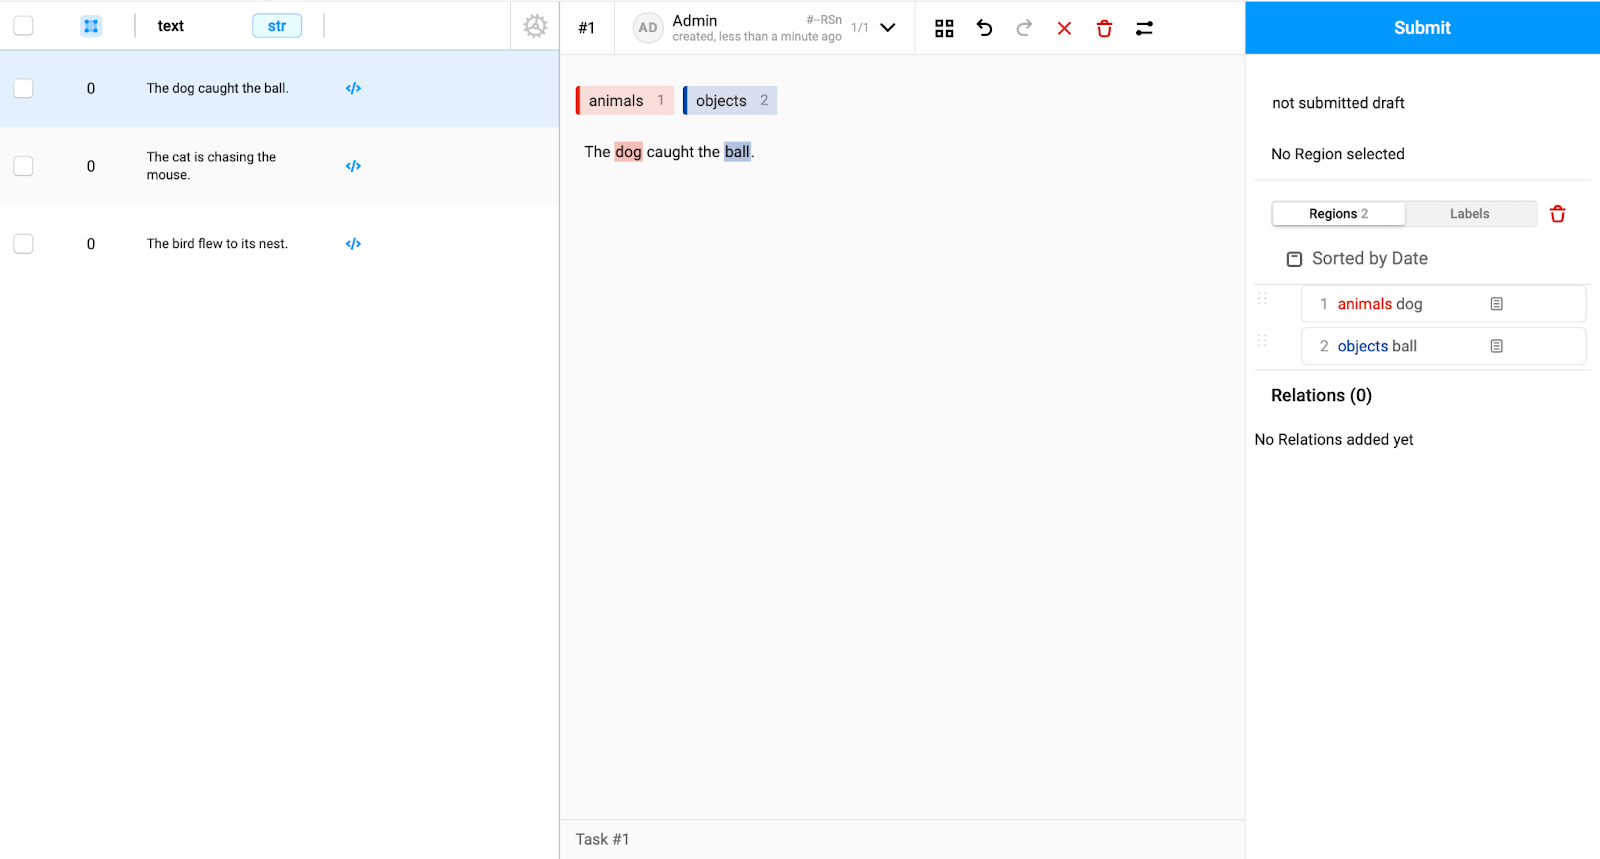
Choose the first ID (data point) and manually label the word that identifies an animal with the red color, and the words that identify an object with the blue color (Note that you chose the color in the previous step). In this case, we highlighted the word dog with red and the word ball with blue. Next, press the blue submit button on the top right of the screen. Repeat this process with the other two columns.
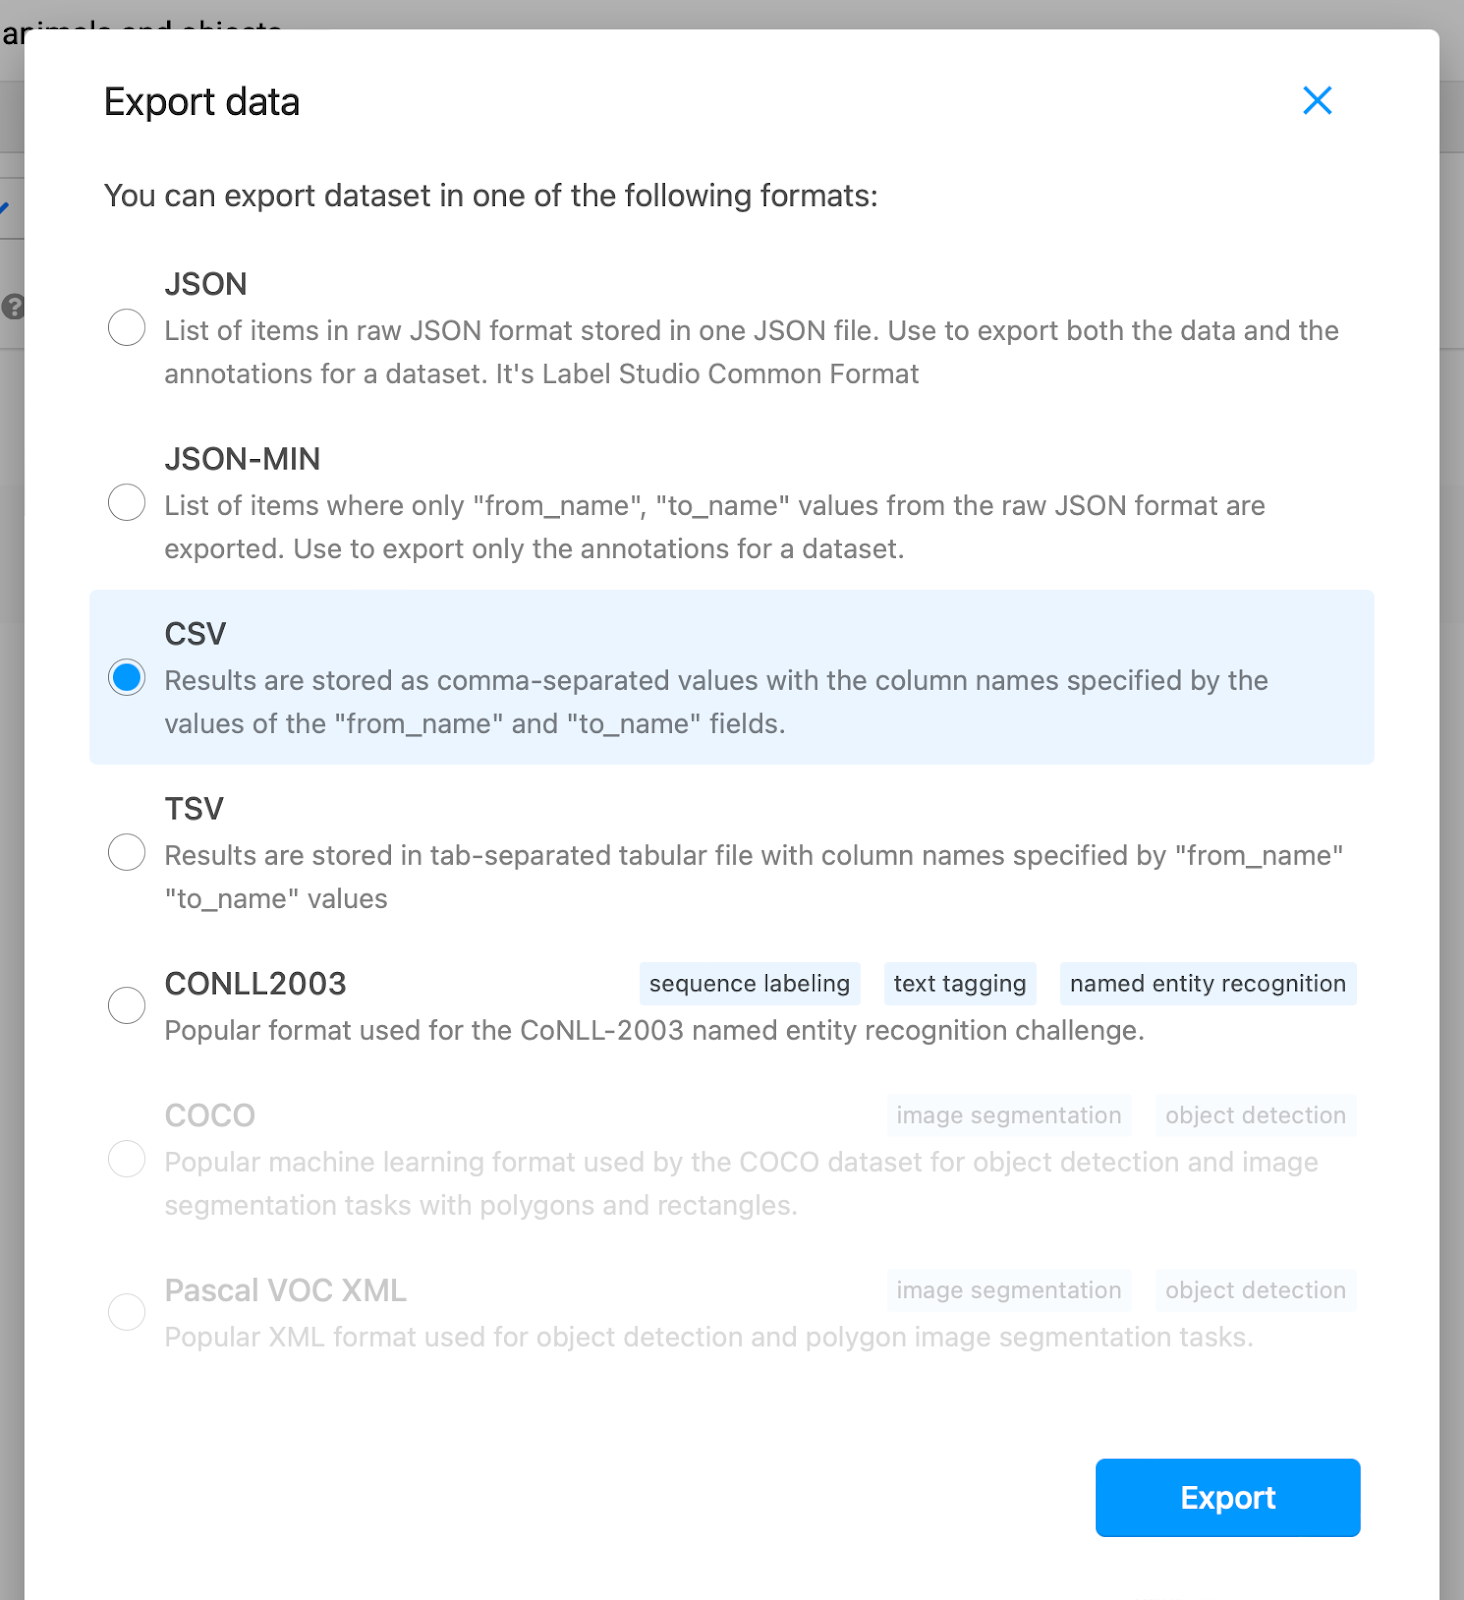
After finishing labeling the data, you can export the annotated data in multiple different formats. To do that, return to the main project screen and click on the export button at the top right of the screen.

After this, you can now export your list as either JSON, JSON-MIN, CSV, TSV, and CONLL2003. Other data formats are not supported here because they are not related to textual data annotation (they’re used for image, and speech data annotations). Our data format of choice would be CSV. You can choose whichever format fits your work best.
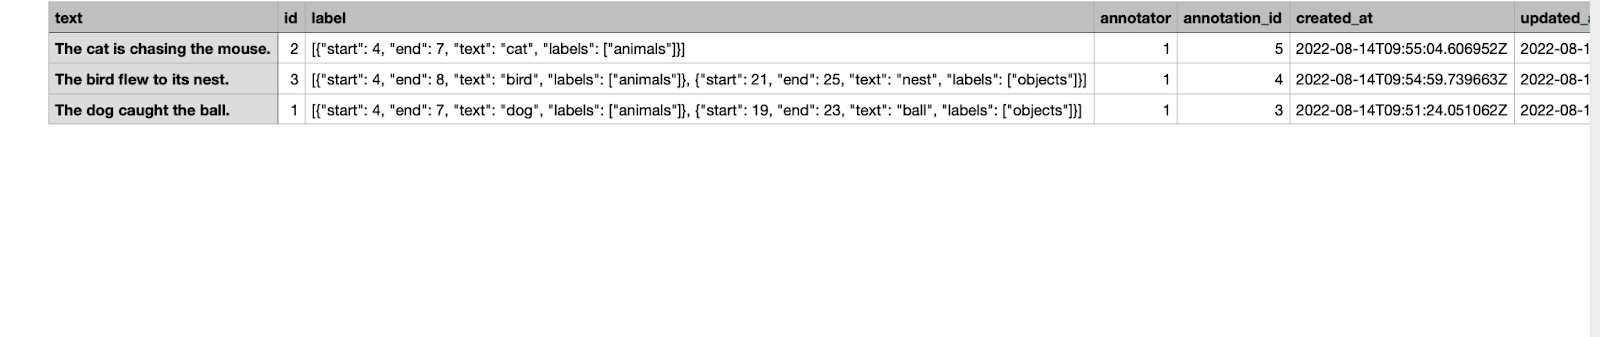
Below is an image of the final annotated data set. It shows how the labeled data is stored. Indicating the starting and ending index of the labeled word, the labeled word itself, and the category to which it belongs.
Data annotation is essential when organizing data for your AI model to be able to efficiently and effectively be trained. The more you label your data, the faster and more accurate your AI model will generalize to a larger dataset. Be sure to set aside some testing datasets that are also labeled to test your AI model’s accuracy.
We encourage you to try different data type annotations such as image or speech recognition as well. By following simple online tutorials and checking the online documentation, completing such a task is fairly straightforward.
There are plenty of data annotating tools (like on Hugging Face or NVIDIA NGC) but being able to annotate and make one yourself is equally as important. Starting from the basics and preparing your input datasets will make or break your AI model.
Have any Questions?
Contact Exxact today!
Data annotation is the process of labeling each point of a dataset to show the actual output that the supervised machine learning model needs to predict. It is the process of categorizing and labeling data; meaning that the user would take each data point available and manually classify it for the machine learning model to use.
For example, to build a machine learning model that takes an image of a cat or a dog and can differentiate and predict which animal is found inside the given image, then the user will need (for example) to feed the model 1,000 images of both animals (500 images for cats and 500 for dogs). For this to work, before feeding the model these images, each image should be labeled as either a dog or a cat. The process of labeling each image into one of these two categories before running them through the model is what data annotation is.
Labeling tens of thousands of data points one by one is tedious, but alternative ways have developed making this task easier. This is where a data annotation tool comes in handy!
Data annotation tools are used to annotate (label) data points in a data set which can help label data sets used in machine learning, deep learning, computer vision, natural language processing, and more.
Different data annotation tools can be used depending on the given task. For example, depending on the data type (text, image, audio) will help decide which tool to utilize. Some companies even create their data annotation tools.
For this article, we used Label Studio, a data annotation tool that allows for the annotation of multiple different data set formats, such as text, images, audio, time series, and multi-domain.
Label Studio is an open-source data labeling tool for labeling and exploring multiple types of data. It allows a user to perform different types of labeling with many data formats. Users can also integrate Label Studio with machine learning models to supply predictions for labels (pre-labels) or perform continuous active learning.
In this article, we will be using Label Studio as our main data annotation tool. We will go over some examples showing how to annotate or label different data sets with different data formats. Before that, we must first start by installing Label Studio software on our device!
The actual installation and usage process of Label Studio is incredibly easy. They offer a small learning curve with a considerable focus on being beginner-friendly accompanied with easy-to-download, short commands, and a clear easy-to-use GUI,
Label Studio offers a diverse set of data formats and labeling choices. For different data formats, Label Studio offers data annotation for images, audio, text, time series, and multi-domain data formats. When it comes to image labeling Label Studio offers object detection, image classification, and semantic segmentation. While text annotation offers text classification, question answering, sentiment analysis, and named entity. For other labeling techniques, please check the official Label Studio website.
With a well-documented website and tons of online tutorials and videos on the usage of Label Studio, users can always find online help when stuck!
Workstations that just work, plain and simple. Exxact offers exactly what you need, tailored specifically to your workload. Contact us today!
Install Label Studio using either pip, brew, git, or docker. We will use pip to install label studio by copy-pasting the following line into the cmd (command line interface):
ip install -U label-studio
After finalizing the installation, copy-paste the following command into the cmd:
Label-studio
Using the following command, a browser page of label studio will be up and open on the browser of your choice.
After that, Label Studio will ask for you to sign up using your account. If necessary, create a new account that only requires an e-mail and password to sign up.
In this simple text data annotation tutorial, we will classify any word belonging to either an animal or an object into two groups.
After logging in to your Label Studio account, start by creating a new data annotation project. Choose a name for your project and give a brief description of what you are trying to achieve with it. In this case, we named the project ‘animals vs objects’ and stated that the main aim is to categorize textual data.
After naming your project and giving it a project description, click on the Data Import button in the center top of the screen. Then click on ‘Upload More Files’ and import the data set of your choice from your local device. For the data used in this example, we have written three simple sentences, each containing a word relating to an animal, an object, or both. Make sure to upload the data file in an accepted format. The format used here is a .txt extension.
Note: do not forget to choose the ‘treat CSV/TSV as a List of tasks’ option.
Next, click on ‘Labeling setup’ on the top right of the screen. As stated earlier, we want to perform data annotation on text data, so click on Natural Language Processing. Natural language processing is a subfield of linguistics, computer science, and artificial intelligence concerned with the interactions between computers and human language, and how to program computers to process and analyze large amounts of natural language data.
Next, click on the ‘Named Entity Recognition’ which will allow us to categorize our data into multiple categories of our choice. Named-entity recognition is a subtask of information extraction that seeks to locate and classify named entities mentioned in unstructured text into pre-defined categories such as names, organizations, locations, medical codes, time expressions, quantities, monetary values, percentages, etc.
After choosing the template option, which in our case is the Named Entity Recognition, we will need to identify our labels or classes. We will delete all the existing labels and create two new ones, the animal and object labels. To create these two labels go to the Add Label names text box on the left of the screen and write these two classes onto two separate lines. After that click on the Add button just below the text box.
After adding the labels you can change the color of each tag as you like. We chose to have the animal class as red and the object class as blue. Once you’re finished, click on the save button on the top right of the screen.
After that, you should find a list containing all the columns found in your data.
Choose the first ID (data point) and manually label the word that identifies an animal with the red color, and the words that identify an object with the blue color (Note that you chose the color in the previous step). In this case, we highlighted the word dog with red and the word ball with blue. Next, press the blue submit button on the top right of the screen. Repeat this process with the other two columns.
After finishing labeling the data, you can export the annotated data in multiple different formats. To do that, return to the main project screen and click on the export button at the top right of the screen.
After this, you can now export your list as either JSON, JSON-MIN, CSV, TSV, and CONLL2003. Other data formats are not supported here because they are not related to textual data annotation (they’re used for image, and speech data annotations). Our data format of choice would be CSV. You can choose whichever format fits your work best.
Below is an image of the final annotated data set. It shows how the labeled data is stored. Indicating the starting and ending index of the labeled word, the labeled word itself, and the category to which it belongs.
Data annotation is essential when organizing data for your AI model to be able to efficiently and effectively be trained. The more you label your data, the faster and more accurate your AI model will generalize to a larger dataset. Be sure to set aside some testing datasets that are also labeled to test your AI model’s accuracy.
We encourage you to try different data type annotations such as image or speech recognition as well. By following simple online tutorials and checking the online documentation, completing such a task is fairly straightforward.
There are plenty of data annotating tools (like on Hugging Face or NVIDIA NGC) but being able to annotate and make one yourself is equally as important. Starting from the basics and preparing your input datasets will make or break your AI model.
Have any Questions?
Contact Exxact today!
