Deep Learning
Introduction to NVIDIA NeMo - Tutorial & Example
August 17, 2022
14 min read

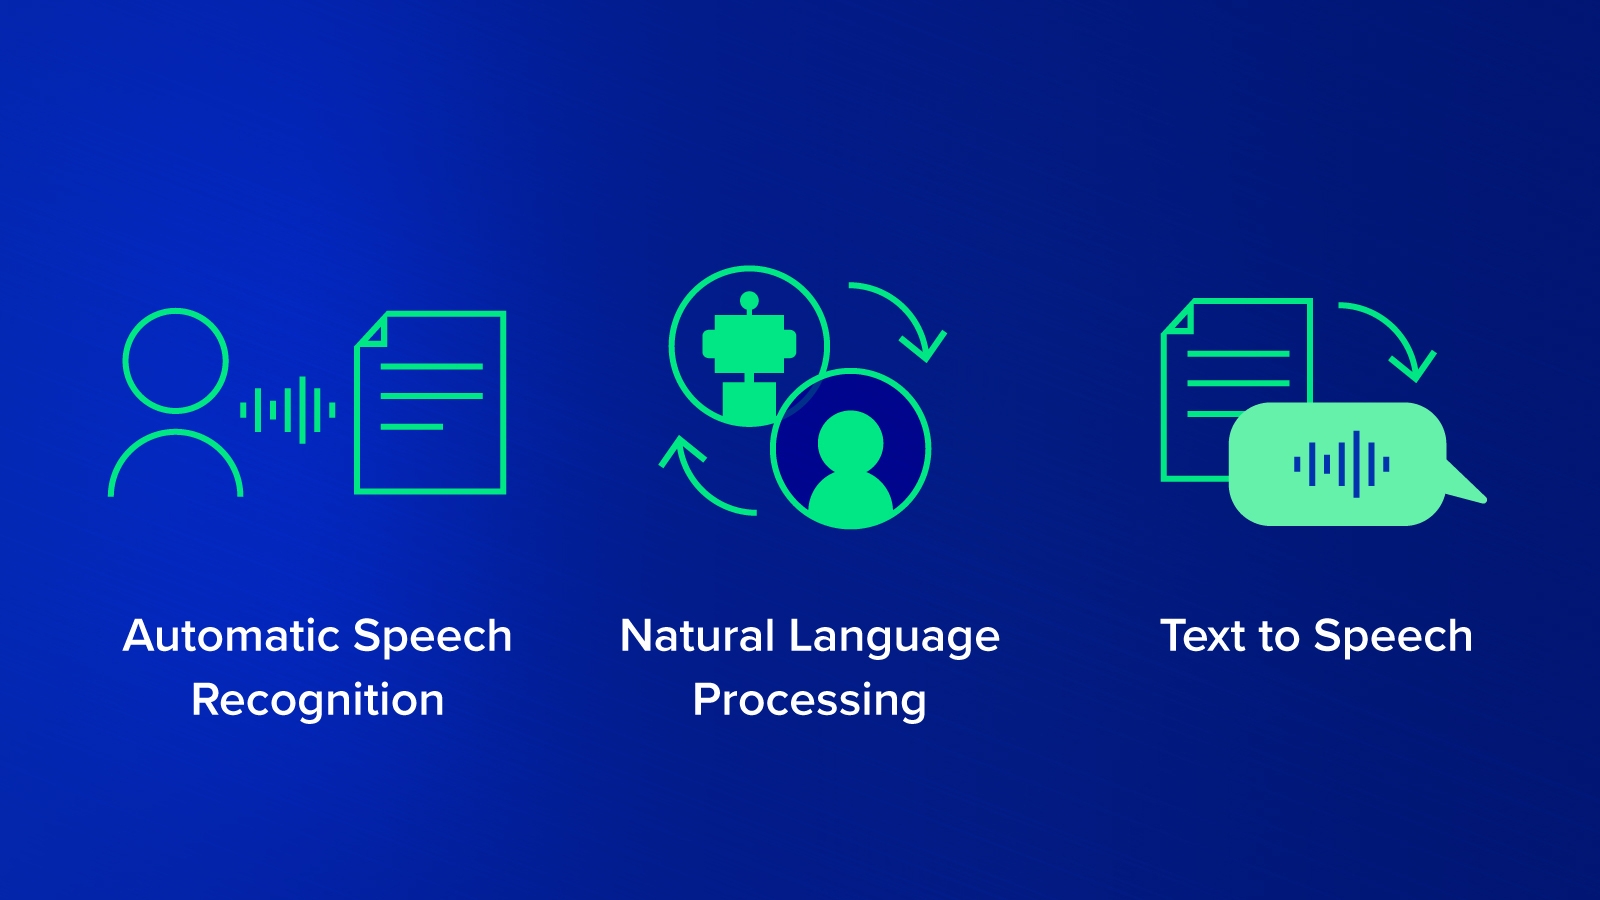
NVIDIA NeMo is a toolkit for building new state-of-the-art conversational AI models. NeMo has separate collections for Automatic Speech Recognition (ASR), Natural Language Processing (NLP), and Text-to-Speech (TTS) models.
Each collection consists of prebuilt modules that include everything needed to train on your data. Every module can easily be customized, extended, and composed to create new conversational AI model architectures. So let's explain briefly what is the ASR, NLP, and TTS models.
ASR, short for Automatic Speech Recognition, is a subfield of machine learning that focuses on techniques used to translate spoken languages into text formats. The main benefit behind these methods is to allow for better word searchability within a given voice message.
ASR models are used commonly in today’s world, the most well-known practical usage does include Apple’s famous voice interaction system known as Siri.
Natural Language Processing or NLP is an artificial intelligence subfield that is capable of understanding and processing different language formats to extract unique insights and patterns.
Most common uses include recommendation systems, in which natural language processing techniques can categorize different items, objects, or services into different categories. Further on, if a user likes certain item categories, recommendation systems can suggest items in the same or similar categories.
TTS, short for Text-to-Speech, is the exact opposite of the previously mentioned Automatic speech recognition field. In ASR, the machine learning model takes in a voice message and converts it into text format. Meanwhile, the Text-to-Speech model takes in data in text format and converts it into speech format.
As the previously mentioned Siri model, an ASR system is used to convert a user's voice into text for Siri to understand then a TTS model is used for Siri to answer in a speech format as well.
In the following sections of this article, we will show you how to run an actual natural language processing model using NVIDIA Nemo.
Before using NeMo, it’s assumed you meet the following prerequisites.
Using natural language processing (NLP), we will build a machine learning model that is capable of detecting the sentiment of a given sentence. A sentiment is meant to categorize a given sentence as either being emotionally positive or negative.
For example, a positive sentiment would be “he worked so hard and achieved great things”. On the opposite side of the spectrum, a negative sentiment would be “his performance was not good enough and he failed to reach his goal”.
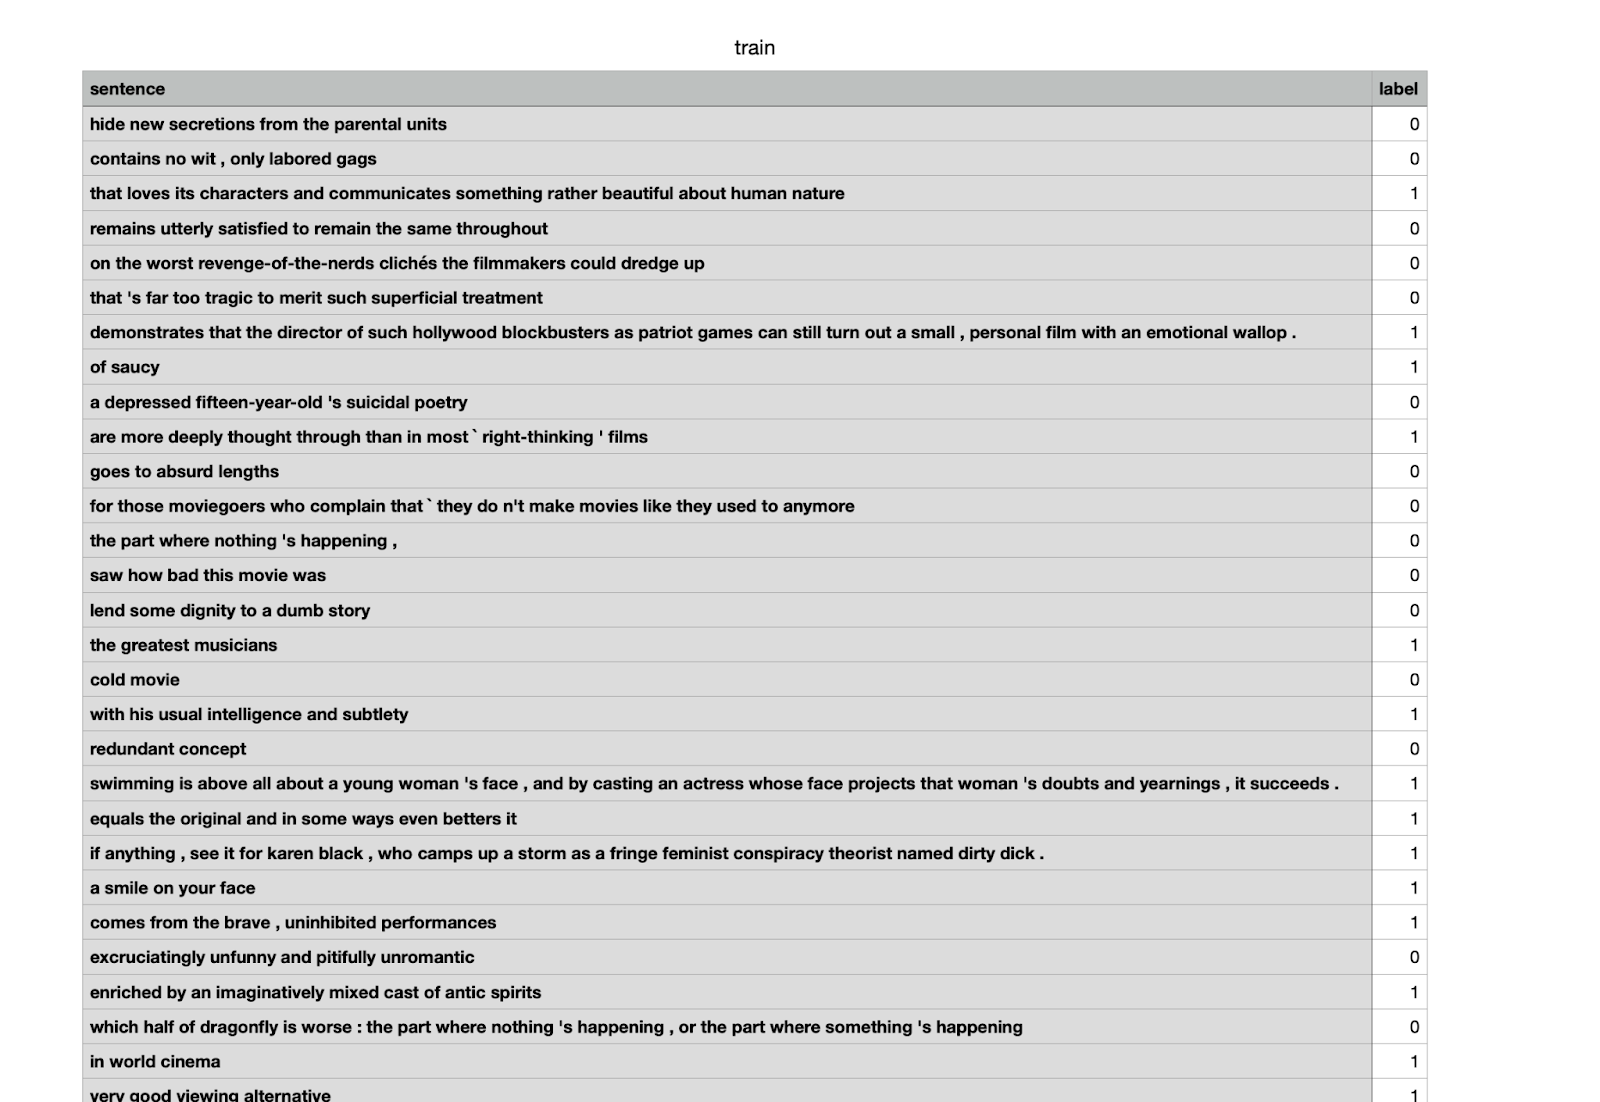
The text classification model used in this tutorial requires the data set to be stored in a TAB-separated file (.tsv) format. The following is the format in which the data should be stored
[WORD][SPACE][WORD][SPACE][WORD][TAB][LABEL]
To even better explain the given format, let's take the first line of our dataset as an example:
The first data point is:
hide new secretions from the parental units: 0
Thus the data must be stored in the format given below:
[hide][SPACE][new][SPACE][secretions][SPACE][from][SPACE][the][SPACE][parental][SPACE][units][TAB][0]
Our data set contains only 2 columns which are the Sentence and Label columns. The sentence column (independent variable) will be used as the input value of our model. This column contains the actual movie comment written by a given user.
For the output variable, we will use the label column (dependent variable), which states the actual sentiment (positive or negative) of the previously written message. The label column is usually manually filled by human users.
View the test classification sentiment analysis example used in this tutorial.
"""
You can run either this notebook locally (if you have all the dependencies and a GPU) or on Google Colab.

Instructions for setting up Colab are as follows:
Open a new Python 3 notebook.
Import this notebook from GitHub (File -> Upload Notebook -> "GITHUB" tab -> copy/paste GitHub URL)
Connect to an instance with a GPU (Runtime -> Change runtime type -> select "GPU" for hardware accelerator)
Run this cell to set up dependencies.
"""
# If you're using Google Colab and not running locally, run this cell
# install NeMo
BRANCH = 'r1.10.0'
!python -m pip install git+https://github.com/NVIDIA/NeMo...;BRANCH#egg=nemo_toolkit[nlp]
If you're not using Colab, you might need to upgrade Jupyter notebook to avoid the following error:
# 'ImportError: IProgress not found. Please update jupyter and ipywidgets.'
Install the ipywidgets extension
! pip install ipywidgets
! jupyter nbextension enable --py widgetsnbextension
# Please restart the kernel after running this cell
Note that the above 2 steps will always be necessary to follow in cases where you are using Google Colab to run your models.
As the actual first step of training our model, we need to import all the needed libraries and packages required.
Some necessary libraries that you may have worked with before might include the torch and pytorch libraries. In this model, we will also use a couple of NeMo packages, such as the nemo.collections and nemo.utils.exp_manager packages.
from nemo.collections import nlp as nemo_nlp
from nemo.utils.exp_manager import exp_manager

import os
import wget
import torch
import pytorch_lightning as pl
from omegaconf import OmegaConf
In this step, we will save our work by creating 2 new directories. You can choose not to create or to create and rename your own directories, but always make sure to replace the old directory names with the new ones in the code.
The last two line commands start with the '!' will install the dataset automatically and then unzip it in the specified Data directory file. Saving you a bit of unnecessary work.
DATA_DIR = "DATA_DIR"
WORK_DIR = "WORK_DIR"
os.environ['DATA_DIR'] = DATA_DIR

os.makedirs(WORK_DIR, exist_ok=True)
os.makedirs(DATA_DIR, exist_ok=True)

! wget <a href="https://dl.fbaipublicfiles.com/glue/data/SST-2.zip" target="_self">https://dl.fbaipublicfiles.com/glue/data/SST-2.zip
</a>! unzip -o SST-2.zip -d {DATA_DIR}Since the Nemo data set has its own unique format, any data set used should be inserted or modified to fit this required format. In our data set, we are required to remove the extra header line. This is done using the sed 1d command which removes the first column from the specified data set. Note that we removed the header line from the training and validation data sets only as the testing data set does not have this problem.
! sed 1d {DATA_DIR}/SST-2/train.tsv > {DATA_DIR}/SST-2/train_nemo_format.tsv
! sed 1d {DATA_DIR}/SST-2/dev.tsv > {DATA_DIR}/SST-2/dev_nemo_format.tsv
! ls -l {DATA_DIR}/SST-2
To print the  first 5 lines of each data set:
print('Contents (first 5 lines) of train.tsv:')
! head -n 5 {DATA_DIR}/SST-2/train_nemo_format.tsv

print('\nContents (first 5 lines) of test.tsv:')
! head -n 5 {DATA_DIR}/SST-2/test.tsvThe NVIDIA Nemo models work using a configuration system, in which a configuration file containing all the necessary data to run our model is saved and utilized. Most of the code written in this tutorial will update and add new data to this file.
To begin with, NVIDIA provides you with a basic YAML configuration file that is ready to be used immediately. Of course, some modifications and tweaks will be needed from model to model. The configuration file will be downloaded to the specified directory.
# download the model's configuration file
MODEL_CONFIG = "text_classification_config.yaml"
CONFIG_DIR = WORK_DIR + '/configs/'
os.makedirs(CONFIG_DIR, exist_ok=True)
if not os.path.exists(CONFIG_DIR + MODEL_CONFIG):
print('Downloading config file...')
wget.download(f'<a href="https://raw.githubusercontent.com/NVIDIA/NeMo/{BRANCH}/examples/nlp/text_classification/conf/">https://raw.githubusercontent.com/NVIDIA/NeMo/{BRANCH}/examples/nlp/text_classification/conf/</a>' + MODEL_CONFIG, CONFIG_DIR)
print('Config file downloaded!')
else:
print ('config file already exists')
config_path = f'{WORK_DIR}/configs/{MODEL_CONFIG}'
print(config_path)
config = OmegaConf.load(config_path)The dataset.num_classes number indicates the different variable values that are used in our data set. In this step we chose our value to be equal to 2 as our label column can have either a 0(negative) or a 1(positive) value. In cases where there is also a neutral value for example, then we should have the num.classes=3.
config.model.dataset.num_classes=2
After downloading and modifying ( removing the header line ) our data set files, we will pass their given path into our configuration file. This is a bit similar to the more known pd.read_csv(“file path”) function.
config.model.train_ds.file_path = os.path.join(DATA_DIR, 'SST-2/train_nemo_format.tsv')
config.model.validation_ds.file_path = os.path.join(DATA_DIR, 'SST-2/dev_nemo_format.tsv')
# Name of the .nemo file where trained model will be saved.
config.save_to = 'trained-model.nemo'
config.export_to = 'trained-model.onnx'
Check if there's a GPU provided and if there is then we will use it.
config.trainer.accelerator = 'gpu' if torch.cuda.is_available() else 'cpu'
config.trainer.devices = 1
Disable distributed training when using Colab to prevent errors
config.trainer.strategy = None
Set up the max number of steps to reduce training time. The training stops when the max_epochs are reached.
config.trainer.max_epochs = 1
Instantiates a PT Trainer object by using the trainer section of the config
trainer = pl.Trainer(**config.trainer)
Nemo offers its users the ability to handle the logging and saving checkpoint tasks automatically.
Since the experiment manager of a trainer object can not be set twice. We repeat the trainer creation code here to prevent errors when this cell is executed more than once.
trainer = pl.Trainer(**config.trainer)
The exp_dir specifies the path to store the checkpoints and also the logs, its default is "./nemo_experiments". The exp_dir provides a path to the current experiment for easy access
exp_dir = exp_manager(trainer, config.exp_manager)
After specifying the BERT-base-uncased model name we will pass the configuration and the trainer parameters to our final model. BERT stands for Bidirectional Encoder Representations from Transformers, which is a transformer-based machine learning technique for natural language processing pre-training, developed by Google.
Set the ‘model.language_model.pretrained_model_name' parameter in the config to the bert-base-uncased model.
config.model.language_model.pretrained_model_name = "bert-base-uncased"
Creating the actual model.
model = nemo_nlp.models.TextClassificationModel(cfg=config.model, trainer=trainer)
Using the trainer.fit() function the actual training of the model starts.
trainer.fit(model)
model.save_to(config.save_to)
Extract the path of the best checkpoint from the training, you may update it to any checkpoint.
checkpoint_path = trainer.checkpoint_callback.best_model_path
Create an evaluation model and load the checkpoint
eval_model =
nemo_nlp.models.TextClassificationModel.load_from_checkpoint(checkpoint_path=checkpoint_path)
Create a data loader config for evaluation, the same data file provided in validation_ds is used here.
eval_config = OmegaConf.create({'file_path': config.model.validation_ds.file_path, 'batch_size': 64, 'shuffle': False, 'num_samples': -1})
eval_model.setup_test_data(test_data_config=eval_config)
A new trainer is created to show how to evaluate a checkpoint from an already trained model. Then we are going to create a copy of the trainer config and update it to be used for the final evaluation.
eval_trainer_cfg = config.trainer.copy()
eval_trainer_cfg.accelerator = 'gpu' if torch.cuda.is_available() else 'cpu' # it is safer to perform evaluation on single GPU as PT is buggy with the last batch on multi-GPUs
eval_trainer_cfg.strategy = None # 'ddp' is buggy with test process in the current PT, it looks like it has been fixed in the latest master
eval_trainer = pl.Trainer(**eval_trainer_cfg)

eval_trainer.test(model=eval_model, verbose=False) # test_dataloaders=eval_dataloader,
Extract the path of the checkpoint
checkpoint_path = trainer.checkpoint_callback.best_model_path
Create an evaluation model and load the checkpoint
infer_model =
nemo_nlp.models.TextClassificationModel.load_from_checkpoint(checkpoint_path=checkpoint_path)
Move the model to the desired device for inference. We move the model to "cuda" if available otherwise "cpu" would be used.
if torch.cuda.is_available():
   infer_model.to("cuda")
else:
   infer_model.to("cpu")
Define the list of queries for inference
queries = ['by the end of no such thing the audience , like beatrice , has a watchful affection for the monster .',
          'director rob marshall went out gunning to make a great one .',
          'uneasy mishmash of styles and genres .']
# max_seq_length=512 is the maximum length BERT supports.
results = infer_model.classifytext(queries=queries, batch_size=3, max_seq_length=512)
print('The prediction results of some sample queries with the trained model:')
for query, result in zip(queries, results):
   print(f'Query : {query}')
   print(f'Predicted label: {result}')
The following are the prediction results of the model:
The prediction results of some sample queries with the trained model:
Query : by the end of no such thing the audience , like beatrice , has a watchful affection for the monster .
Predicted label: 1
Query : director rob marshall went out gunning to make a great one .
Predicted label: 1
Query: uneasy mishmash of styles and genres .
Predicted label: 0
For our 3 examples, the model predicted the results correctly, where 1 means that the sentiment of the sentence was positive and 0 means that it was negative.
In this tutorial we explained what NVIDIA NeMo is and its main focus on enhancing the machine learning field. We also explained some of its modules, such as Automatic Speech Recognition, Natural Language Processing, and Text-to-Speech which are smaller subfields in text classification. Lastly, we used NVIDIA NeMo to build a natural language processing model that is capable of predicting a given text’s sentimental meaning.
With conversational artificial intelligence being on the rise, machine learning toolkits such as NVIDIA’s NeMo are becoming more and more dependable by the day. By allowing its users to train their models with great ease, it might just be worth a try.
Have any Questions?
Contact Exxact today!
NVIDIA NeMo is a toolkit for building new state-of-the-art conversational AI models. NeMo has separate collections for Automatic Speech Recognition (ASR), Natural Language Processing (NLP), and Text-to-Speech (TTS) models.
Each collection consists of prebuilt modules that include everything needed to train on your data. Every module can easily be customized, extended, and composed to create new conversational AI model architectures. So let's explain briefly what is the ASR, NLP, and TTS models.
ASR, short for Automatic Speech Recognition, is a subfield of machine learning that focuses on techniques used to translate spoken languages into text formats. The main benefit behind these methods is to allow for better word searchability within a given voice message.
ASR models are used commonly in today’s world, the most well-known practical usage does include Apple’s famous voice interaction system known as Siri.
Natural Language Processing or NLP is an artificial intelligence subfield that is capable of understanding and processing different language formats to extract unique insights and patterns.
Most common uses include recommendation systems, in which natural language processing techniques can categorize different items, objects, or services into different categories. Further on, if a user likes certain item categories, recommendation systems can suggest items in the same or similar categories.
TTS, short for Text-to-Speech, is the exact opposite of the previously mentioned Automatic speech recognition field. In ASR, the machine learning model takes in a voice message and converts it into text format. Meanwhile, the Text-to-Speech model takes in data in text format and converts it into speech format.
As the previously mentioned Siri model, an ASR system is used to convert a user's voice into text for Siri to understand then a TTS model is used for Siri to answer in a speech format as well.
In the following sections of this article, we will show you how to run an actual natural language processing model using NVIDIA Nemo.
Before using NeMo, it’s assumed you meet the following prerequisites.
Using natural language processing (NLP), we will build a machine learning model that is capable of detecting the sentiment of a given sentence. A sentiment is meant to categorize a given sentence as either being emotionally positive or negative.
For example, a positive sentiment would be “he worked so hard and achieved great things”. On the opposite side of the spectrum, a negative sentiment would be “his performance was not good enough and he failed to reach his goal”.
The text classification model used in this tutorial requires the data set to be stored in a TAB-separated file (.tsv) format. The following is the format in which the data should be stored
[WORD][SPACE][WORD][SPACE][WORD][TAB][LABEL]
To even better explain the given format, let's take the first line of our dataset as an example:
The first data point is:
hide new secretions from the parental units: 0
Thus the data must be stored in the format given below:
[hide][SPACE][new][SPACE][secretions][SPACE][from][SPACE][the][SPACE][parental][SPACE][units][TAB][0]
Our data set contains only 2 columns which are the Sentence and Label columns. The sentence column (independent variable) will be used as the input value of our model. This column contains the actual movie comment written by a given user.
For the output variable, we will use the label column (dependent variable), which states the actual sentiment (positive or negative) of the previously written message. The label column is usually manually filled by human users.
View the test classification sentiment analysis example used in this tutorial.
"""
You can run either this notebook locally (if you have all the dependencies and a GPU) or on Google Colab.

Instructions for setting up Colab are as follows:
Open a new Python 3 notebook.
Import this notebook from GitHub (File -> Upload Notebook -> "GITHUB" tab -> copy/paste GitHub URL)
Connect to an instance with a GPU (Runtime -> Change runtime type -> select "GPU" for hardware accelerator)
Run this cell to set up dependencies.
"""
# If you're using Google Colab and not running locally, run this cell
# install NeMo
BRANCH = 'r1.10.0'
!python -m pip install git+https://github.com/NVIDIA/NeMo...;BRANCH#egg=nemo_toolkit[nlp]
If you're not using Colab, you might need to upgrade Jupyter notebook to avoid the following error:
# 'ImportError: IProgress not found. Please update jupyter and ipywidgets.'
Install the ipywidgets extension
! pip install ipywidgets
! jupyter nbextension enable --py widgetsnbextension
# Please restart the kernel after running this cell
Note that the above 2 steps will always be necessary to follow in cases where you are using Google Colab to run your models.
As the actual first step of training our model, we need to import all the needed libraries and packages required.
Some necessary libraries that you may have worked with before might include the torch and pytorch libraries. In this model, we will also use a couple of NeMo packages, such as the nemo.collections and nemo.utils.exp_manager packages.
from nemo.collections import nlp as nemo_nlp
from nemo.utils.exp_manager import exp_manager

import os
import wget
import torch
import pytorch_lightning as pl
from omegaconf import OmegaConf
In this step, we will save our work by creating 2 new directories. You can choose not to create or to create and rename your own directories, but always make sure to replace the old directory names with the new ones in the code.
The last two line commands start with the '!' will install the dataset automatically and then unzip it in the specified Data directory file. Saving you a bit of unnecessary work.
DATA_DIR = "DATA_DIR"
WORK_DIR = "WORK_DIR"
os.environ['DATA_DIR'] = DATA_DIR

os.makedirs(WORK_DIR, exist_ok=True)
os.makedirs(DATA_DIR, exist_ok=True)

! wget <a href="https://dl.fbaipublicfiles.com/glue/data/SST-2.zip" target="_self">https://dl.fbaipublicfiles.com/glue/data/SST-2.zip
</a>! unzip -o SST-2.zip -d {DATA_DIR}Since the Nemo data set has its own unique format, any data set used should be inserted or modified to fit this required format. In our data set, we are required to remove the extra header line. This is done using the sed 1d command which removes the first column from the specified data set. Note that we removed the header line from the training and validation data sets only as the testing data set does not have this problem.
! sed 1d {DATA_DIR}/SST-2/train.tsv > {DATA_DIR}/SST-2/train_nemo_format.tsv
! sed 1d {DATA_DIR}/SST-2/dev.tsv > {DATA_DIR}/SST-2/dev_nemo_format.tsv
! ls -l {DATA_DIR}/SST-2
To print the  first 5 lines of each data set:
print('Contents (first 5 lines) of train.tsv:')
! head -n 5 {DATA_DIR}/SST-2/train_nemo_format.tsv

print('\nContents (first 5 lines) of test.tsv:')
! head -n 5 {DATA_DIR}/SST-2/test.tsvThe NVIDIA Nemo models work using a configuration system, in which a configuration file containing all the necessary data to run our model is saved and utilized. Most of the code written in this tutorial will update and add new data to this file.
To begin with, NVIDIA provides you with a basic YAML configuration file that is ready to be used immediately. Of course, some modifications and tweaks will be needed from model to model. The configuration file will be downloaded to the specified directory.
# download the model's configuration file
MODEL_CONFIG = "text_classification_config.yaml"
CONFIG_DIR = WORK_DIR + '/configs/'
os.makedirs(CONFIG_DIR, exist_ok=True)
if not os.path.exists(CONFIG_DIR + MODEL_CONFIG):
print('Downloading config file...')
wget.download(f'<a href="https://raw.githubusercontent.com/NVIDIA/NeMo/{BRANCH}/examples/nlp/text_classification/conf/">https://raw.githubusercontent.com/NVIDIA/NeMo/{BRANCH}/examples/nlp/text_classification/conf/</a>' + MODEL_CONFIG, CONFIG_DIR)
print('Config file downloaded!')
else:
print ('config file already exists')
config_path = f'{WORK_DIR}/configs/{MODEL_CONFIG}'
print(config_path)
config = OmegaConf.load(config_path)The dataset.num_classes number indicates the different variable values that are used in our data set. In this step we chose our value to be equal to 2 as our label column can have either a 0(negative) or a 1(positive) value. In cases where there is also a neutral value for example, then we should have the num.classes=3.
config.model.dataset.num_classes=2
After downloading and modifying ( removing the header line ) our data set files, we will pass their given path into our configuration file. This is a bit similar to the more known pd.read_csv(“file path”) function.
config.model.train_ds.file_path = os.path.join(DATA_DIR, 'SST-2/train_nemo_format.tsv')
config.model.validation_ds.file_path = os.path.join(DATA_DIR, 'SST-2/dev_nemo_format.tsv')
# Name of the .nemo file where trained model will be saved.
config.save_to = 'trained-model.nemo'
config.export_to = 'trained-model.onnx'
Check if there's a GPU provided and if there is then we will use it.
config.trainer.accelerator = 'gpu' if torch.cuda.is_available() else 'cpu'
config.trainer.devices = 1
Disable distributed training when using Colab to prevent errors
config.trainer.strategy = None
Set up the max number of steps to reduce training time. The training stops when the max_epochs are reached.
config.trainer.max_epochs = 1
Instantiates a PT Trainer object by using the trainer section of the config
trainer = pl.Trainer(**config.trainer)
Nemo offers its users the ability to handle the logging and saving checkpoint tasks automatically.
Since the experiment manager of a trainer object can not be set twice. We repeat the trainer creation code here to prevent errors when this cell is executed more than once.
trainer = pl.Trainer(**config.trainer)
The exp_dir specifies the path to store the checkpoints and also the logs, its default is "./nemo_experiments". The exp_dir provides a path to the current experiment for easy access
exp_dir = exp_manager(trainer, config.exp_manager)
After specifying the BERT-base-uncased model name we will pass the configuration and the trainer parameters to our final model. BERT stands for Bidirectional Encoder Representations from Transformers, which is a transformer-based machine learning technique for natural language processing pre-training, developed by Google.
Set the ‘model.language_model.pretrained_model_name' parameter in the config to the bert-base-uncased model.
config.model.language_model.pretrained_model_name = "bert-base-uncased"
Creating the actual model.
model = nemo_nlp.models.TextClassificationModel(cfg=config.model, trainer=trainer)
Using the trainer.fit() function the actual training of the model starts.
trainer.fit(model)
model.save_to(config.save_to)
Extract the path of the best checkpoint from the training, you may update it to any checkpoint.
checkpoint_path = trainer.checkpoint_callback.best_model_path
Create an evaluation model and load the checkpoint
eval_model =
nemo_nlp.models.TextClassificationModel.load_from_checkpoint(checkpoint_path=checkpoint_path)
Create a data loader config for evaluation, the same data file provided in validation_ds is used here.
eval_config = OmegaConf.create({'file_path': config.model.validation_ds.file_path, 'batch_size': 64, 'shuffle': False, 'num_samples': -1})
eval_model.setup_test_data(test_data_config=eval_config)
A new trainer is created to show how to evaluate a checkpoint from an already trained model. Then we are going to create a copy of the trainer config and update it to be used for the final evaluation.
eval_trainer_cfg = config.trainer.copy()
eval_trainer_cfg.accelerator = 'gpu' if torch.cuda.is_available() else 'cpu' # it is safer to perform evaluation on single GPU as PT is buggy with the last batch on multi-GPUs
eval_trainer_cfg.strategy = None # 'ddp' is buggy with test process in the current PT, it looks like it has been fixed in the latest master
eval_trainer = pl.Trainer(**eval_trainer_cfg)

eval_trainer.test(model=eval_model, verbose=False) # test_dataloaders=eval_dataloader,
Extract the path of the checkpoint
checkpoint_path = trainer.checkpoint_callback.best_model_path
Create an evaluation model and load the checkpoint
infer_model =
nemo_nlp.models.TextClassificationModel.load_from_checkpoint(checkpoint_path=checkpoint_path)
Move the model to the desired device for inference. We move the model to "cuda" if available otherwise "cpu" would be used.
if torch.cuda.is_available():
   infer_model.to("cuda")
else:
   infer_model.to("cpu")
Define the list of queries for inference
queries = ['by the end of no such thing the audience , like beatrice , has a watchful affection for the monster .',
          'director rob marshall went out gunning to make a great one .',
          'uneasy mishmash of styles and genres .']
# max_seq_length=512 is the maximum length BERT supports.
results = infer_model.classifytext(queries=queries, batch_size=3, max_seq_length=512)
print('The prediction results of some sample queries with the trained model:')
for query, result in zip(queries, results):
   print(f'Query : {query}')
   print(f'Predicted label: {result}')
The following are the prediction results of the model:
The prediction results of some sample queries with the trained model:
Query : by the end of no such thing the audience , like beatrice , has a watchful affection for the monster .
Predicted label: 1
Query : director rob marshall went out gunning to make a great one .
Predicted label: 1
Query: uneasy mishmash of styles and genres .
Predicted label: 0
For our 3 examples, the model predicted the results correctly, where 1 means that the sentiment of the sentence was positive and 0 means that it was negative.
In this tutorial we explained what NVIDIA NeMo is and its main focus on enhancing the machine learning field. We also explained some of its modules, such as Automatic Speech Recognition, Natural Language Processing, and Text-to-Speech which are smaller subfields in text classification. Lastly, we used NVIDIA NeMo to build a natural language processing model that is capable of predicting a given text’s sentimental meaning.
With conversational artificial intelligence being on the rise, machine learning toolkits such as NVIDIA’s NeMo are becoming more and more dependable by the day. By allowing its users to train their models with great ease, it might just be worth a try.
Have any Questions?
Contact Exxact today!
